There’s nothing quite as frustrating as noticing the unwelcome return of hard water—laundry feels stiff, dishes spotty, and scale reappears on fixtures. Often, the culprit is not a faulty water softener itself, but a clogged drain line preventing proper regeneration. This common issue can disrupt your entire water treatment system, leading to inefficient operation and wasted water. Understanding how to quickly diagnose and clear a clogged water softener drain line yourself can save you time, money, and the inconvenience of hard water. This comprehensive guide will walk you through identifying the problem, gathering the right tools, executing DIY solutions, and implementing preventative measures to keep your system running smoothly.
Understanding Your Water Softener’s Drain Line and Why it Clogs
What is the Water Softener Drain Line?
Table is empty.The water softener drain line is a vital component that facilitates the removal of mineral-rich wastewater, known as brine, during the system’s regeneration cycle. This cycle is essential for cleaning the resin beads within the softener, allowing them to continue removing hardness minerals from your water supply. When working correctly, the drain line ensures that the flushed-out impurities are safely expelled, preventing them from re-entering your home’s water system. Proper function of this line is crucial for your softener’s overall efficiency and the continuous supply of soft water.
Common Causes of Clogged Drain Lines
Several factors can contribute to a blocked water softener drain line, often stemming from the very process designed to soften your water. One of the primary culprits is salt buildup, which can manifest as “salt mushing” where salt granules break down into sludge, or “salt bridges,” where a hard crust forms above the water level in the brine tank. These formations prevent salt from dissolving correctly, hindering the regeneration process and potentially backing up into the drain line.
Beyond salt, sediment and mineral deposits like iron, calcium, and magnesium can accumulate over time, especially in areas with very hard water or if pre-filters are not adequately maintained. Physical obstructions such as kinks or collapsed hoses are also common, particularly in older installations or when the line is not properly secured. Less direct causes include malfunctions in the control valve or injector, which can disrupt the brine draw and regeneration process, subsequently impacting drainage. Finally, improper installation, such as a lack of an air gap or an incorrect downward slope, can impede flow and lead to standing water and blockages.
Signs of a Clogged Water Softener Drain Line
Identifying a clogged drain line early can prevent more significant issues. One of the most obvious signs is water softener overflow, where excess water accumulates in the brine tank and may even spill out. Another indicator is continuous draining from the system, which can signal a blockage causing backflow or a stuck valve.
You might also notice the unwelcome return of hard water symptoms throughout your home, such as new spots on dishes, scale buildup on faucets and showerheads, or soap not lathering effectively. These signs suggest the system is not regenerating properly due to the clog. Additionally, a malfunctioning regeneration cycle or low water pressure can point to a drain line issue, as the system struggles to complete its cleaning process or water flow is restricted.
Essential Tools and Materials for DIY Drain Line Unclogging
Before you tackle a clogged water softener drain line, gathering the necessary tools and materials will ensure a smooth and efficient repair process. Safety should always be your top priority, so start by preparing protective gear.
- Safety Gear: Always wear gloves to protect your hands from salt residue and potential grime, and eye protection to shield your eyes from splashes or dislodged debris.
- Basic Hand Tools: Keep a set of pliers and screwdrivers handy for disconnecting hoses and opening access panels. Clean cloths or rags are essential for wiping away grime and drying components. A bucket will be indispensable for catching any water or debris that drains from the line.
- Cleaning Agents: For dissolving mineral and salt buildup, hot water is often effective. You can also create natural cleaning solutions using common household items like white vinegar and baking soda. These are environmentally friendly and safe for your plumbing system. Avoid using harsh chemical drain cleaners, as they can damage plastic components within your water softener and plumbing.
- Mechanical Tools: A small, flexible drain snake or auger can be incredibly useful for clearing deeper or more stubborn clogs that are out of reach. For physically removing salt mushing or breaking up salt bridges in the brine tank, a long-handled tool like a broom handle or a sturdy stick is ideal. A wet/dry vacuum can also be employed to suction out water and loose debris from the brine tank or drain line.
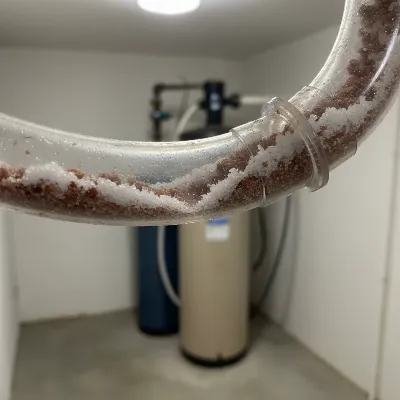 A close-up view of a clogged water softener drain line, showing salt and sediment buildup inside a transparent hose connected to a water softener unit. The hose is slightly kinked, and dirty water is visible.
Step-by-Step Guide: How to Unclog Your Water Softener Drain Line
Successfully clearing your water softener’s drain line requires a systematic approach. Follow these steps carefully to ensure safety and effectiveness.
Step 1: Safety First and Bypass the System
Before attempting any repairs, prioritize safety. First, locate your water softener’s bypass valve and switch it to the “bypass” position. This stops water from flowing into and out of the softener, preventing accidental leaks or water damage during your work. Next, unplug the water softener from its power outlet to eliminate any electrical hazards.
Step 2: Visual Inspection and Initial Checks
With the system bypassed and unplugged, begin with a thorough visual inspection. Examine the entire length of the drain hose for any obvious kinks, sharp bends, or visible obstructions. Straighten any kinks you find. Then, open your brine tank lid and look for signs of salt bridges—a hardened crust of salt—or salt mushing at the bottom. If you find a salt bridge, use a long-handled tool, like a broom handle, to gently break it apart, being careful not to puncture the tank liner. Scoop out any loose salt and mushy residue. Finally, check the float valve inside the brine tank; it should move freely up and down. If it’s stuck, gently free it to ensure proper water level regulation.
Step 3: Disconnect and Clear the Drain Line
Now, focus on the drain line itself. Locate where it connects to the water softener’s control valve and where it terminates into a household drain (e.g., laundry tub, floor drain, or standpipe). Disconnect the drain line from both ends. Once disconnected, inspect the drain port on the control valve for any sediment or residue and clean it with a cloth.
Next, address the hose. You can try to blow compressed air through the hose to dislodge minor clogs. Alternatively, use a long, flexible brush designed for cleaning hoses to scrub the interior. For more stubborn blockages, carefully flush the line with hot water from a faucet. If the clog persists and seems deeper, a small drain snake or auger can be fed through the hose to break apart and pull out obstructions. Remember to work gently to avoid damaging the hose.
Step 4: Clean Specific Components (if necessary)
If the drain line appears clear but the problem persists, other components might be indirectly affecting drainage. The Venturi/Injector assembly on the control valve is a common area for clogs due to sediment. Consult your owner’s manual for instructions on how to carefully disassemble and clean this component with warm, soapy water. Similarly, if your brine tank had significant salt mushing or sediment, a more thorough brine tank cleaning might be necessary. This involves emptying the tank completely, scrubbing the interior with a mild soap solution, rinsing it thoroughly, and then refilling it with fresh salt and water.
Step 5: Reassemble, Restore, and Test
Once you’ve cleared the clogs and cleaned any affected components, it’s time to reassemble your system. Reconnect all hoses and components securely, ensuring clips and fittings are tight. Return the water softener to service by switching the bypass valve back to the “service” position and plugging the unit back in. Finally, initiate a manual regeneration cycle according to your softener’s instructions. Carefully observe the drain line during this cycle to ensure water is flowing freely and without obstruction. Listen for any unusual noises and check for leaks at connections. This test will confirm whether your DIY unclogging efforts were successful.
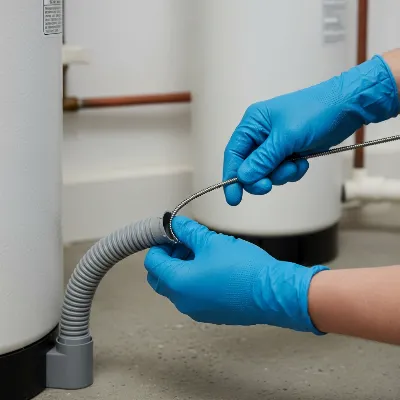 A person wearing gloves using a flexible drain snake to clear a water softener drain line, with the brine tank visible in the background in a home utility room.
Comparison of DIY Unclogging Methods and Prevention Strategies
Maintaining a clear water softener drain line is crucial for its performance. Here’s a comparison of DIY unclogging methods and prevention strategies:
| Feature | Visual Inspection & Physical Clearing | Natural Cleaning Solutions (Vinegar/Baking Soda) | Drain Snaking (Manual) | Professional Plumbing Service |
|---|---|---|---|---|
| Pros | Quick, no cost, identifies obvious issues, prevents worsening problems | Environmentally friendly, safe for pipes, removes minor mineral buildup | Effective for deeper, physical clogs, good reach | Expert diagnosis, specialized tools, warranty, complex repairs |
| Cons | May miss hidden clogs, limited reach for internal issues | Less effective for severe physical blockages, requires soak time | Can damage pipes if not careful, limited to accessible areas | Higher cost, requires scheduling, not always immediate |
| Best For | Kinks, visible obstructions, minor salt bridges, routine checks | Mineral scale, minor organic clogs, proactive maintenance | Hair, sediment, deeper blockages within the line | Complex control valve issues, persistent clogs, system failures, unfamiliarity with DIY |
Preventative Maintenance: Avoiding Future Clogs
Preventing drain line clogs is far easier than fixing them. Implementing a routine maintenance schedule can significantly extend the life of your water softener and ensure a continuous supply of soft water.
- Regular Salt Checks and Management: Make it a habit to check your brine tank salt level monthly. Always refill it before the level drops below one-third, but avoid overfilling beyond two-thirds, as this can encourage salt bridging. If you notice a salt bridge forming, break it up promptly with a long tool to ensure the salt dissolves properly. Using high-quality, pure water softener salt with fewer impurities can also minimize the likelihood of mushing and bridging.
- Brine Tank Cleaning: An annual deep cleaning of your brine tank is highly recommended. This involves emptying the tank, scrubbing away any salt residue or sediment buildup, and rinsing thoroughly. This ensures that the brine solution is clean and free of contaminants that could eventually clog the drain line.
- Drain Line Inspection: Periodically inspect the entire length of your drain line for any kinks, tight bends, or signs of sediment buildup. Ensure the hose maintains a consistent downward slope to prevent standing water and potential clogs. Straighten any kinks and secure the line if it has shifted.
- Proper Installation: If you’re installing a new water softener or reconfiguring your existing setup, ensure the drain line is installed with a minimum 1.5-inch air gap at the discharge point. This critical safety measure prevents backflow contamination of your home’s potable water supply and is often a local plumbing code requirement. Additionally, confirm the drain line is routed to an approved drain (e.g., laundry sink, floor drain, or standpipe) and secured to prevent movement during regeneration cycles.
- Scheduled Professional Maintenance: While many issues can be DIY-fixed, scheduling annual professional maintenance is invaluable. A certified technician can perform thorough inspections, calibrate settings, assess the resin bed, clean internal components like the control valve and injector, and identify potential problems before they escalate into costly repairs. “Regular professional tune-ups extend the lifespan of your system and prevent those pesky, unexpected issues,” says John Smith, a Master Plumber with over 20 years of experience in water treatment. This proactive approach ensures optimal performance and efficiency.
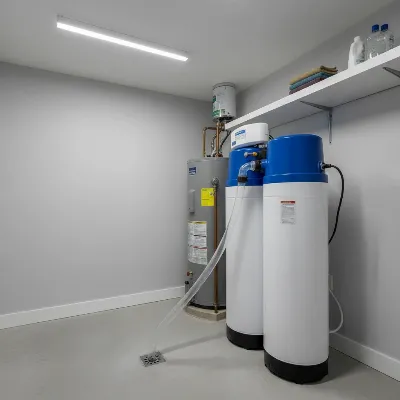 A well-maintained water softener system in a clean utility room, with a clearly visible, properly installed and unclogged drain line.
Buying Guide: Important Considerations for Water Softener Owners
As a water softener owner, understanding your system and knowing how to maintain it goes beyond simple troubleshooting. Making informed decisions can greatly impact its longevity and performance.
- Understand Your System: Familiarize yourself with your specific water softener model. Keep the owner’s manual handy, as it provides detailed diagrams, troubleshooting steps, and manufacturer-recommended maintenance schedules unique to your unit. Knowing how your system operates will empower you to perform DIY tasks more confidently and accurately.
- Quality Salt Matters: The type of salt you use can significantly influence the health of your water softener. Opt for high-quality salt pellets or cubes, specifically designed for water softeners, with minimal impurities. These are less likely to cause salt mushing or bridging, which are common precursors to drain line clogs. Avoid rock salt, which can contain more insoluble minerals.
- Regular Monitoring is Key: Beyond scheduled maintenance, pay attention to the everyday performance of your water softener. Notice any changes in water quality (e.g., return of hard water signs), unusual noises during regeneration, or unexpected water levels in the brine tank. Early detection of these subtle cues can help you address minor issues before they escalate into major problems, potentially preventing drain line clogs.
- Know When to Call a Pro: While many drain line clogs can be fixed with DIY methods, it’s crucial to recognize your limitations. If you’ve tried basic troubleshooting and the problem persists, or if you suspect a more complex internal issue with the control valve, injector, or other system components, do not hesitate to contact a qualified plumbing or water treatment professional. Attempting advanced repairs without the necessary expertise can lead to further damage and more expensive fixes.
Conclusion
A clogged water softener drain line can quickly undermine your home’s water quality and the efficiency of your softening system. By understanding the common causes, recognizing the warning signs, and following a methodical DIY approach, you can effectively clear most blockages and restore your system to optimal performance. Remember to prioritize safety by bypassing the system and unplugging it before starting any work. Regular preventative maintenance, including consistent salt management, brine tank cleaning, and drain line inspections, is paramount to avoiding future clogs and ensuring your water softener continues to provide soft, clean water for years to come.
What steps will you take to ensure your water softener’s drain line stays clear and efficient?
Frequently Asked Questions
Why is my water softener constantly draining?
Constant draining often indicates an issue with the control valve, a stuck float valve in the brine tank, or a blockage in the drain line causing backflow. During regeneration, the system should drain intermittently, not continuously. Check the float valve for free movement and inspect the drain line for any obstructions.
Can I use chemical drain cleaner in my water softener drain line?
It is not recommended to use harsh chemical drain cleaners in your water softener drain line. These chemicals can corrode or damage the plastic components, seals, and resin beads within your water softener system, potentially leading to more extensive and costly repairs. Stick to natural solutions like hot water, vinegar, or baking soda, or mechanical methods like snaking.
How often should I clean my water softener drain line?
While the drain line itself may not need frequent cleaning unless a clog occurs, it’s wise to visually inspect it quarterly for kinks or obvious buildup. An annual thorough inspection and cleaning of the brine tank and potentially the drain port on the control valve is recommended as part of your overall Water Softener maintenance.
What is a salt bridge, and how does it affect the drain line?
A salt bridge is a hard crust of salt that forms in the brine tank, typically above the water level. It prevents the salt from dissolving into the water, meaning the brine solution cannot be properly created or drawn into the resin tank for regeneration. This lack of proper regeneration can lead to the brine tank overflowing, and the ineffective brine solution struggling to flush through the drain line, exacerbating drain issues.
When should I call a professional for a clogged drain line?
You should call a professional if you’ve attempted DIY unclogging methods and the problem persists, or if you suspect the issue stems from complex internal components like a faulty control valve or injector. Professionals have specialized tools and expertise to diagnose and repair issues safely, ensuring your system operates correctly without causing further damage.