A leaking water softener can transform a household convenience into a stressful situation, threatening water damage and compromising your home’s soft water supply. Imagine stepping into your utility room only to find a puddle forming around your water softening system – a common, yet alarming, sight for many homeowners. Hard water is notorious for its damaging effects on appliances and plumbing, making a functional water softener an essential part of a modern home. When this vital appliance starts to leak, it signals a problem that needs immediate attention, not just to protect your property, but to ensure your water quality remains uncompromised. This guide will delve into the most common reasons why your water softener might be leaking and, crucially, equip you with five quick and effective fixes you can implement at home.
Why Your Water Softener Is Leaking: Common Culprits
Understanding the source of a leak is the first critical step towards a resolution. Water softeners are complex systems, and leaks can stem from various components, each requiring a specific diagnostic approach. Identifying where the water is coming from can often tell you what kind of problem you’re facing, distinguishing between a simple adjustment and a more serious repair.
Faulty Valves and Seals
|
Our Picks for the Best Water Softener in 2026
As an Amazon Associate I earn from qualifying purchases.
|
||
| Num | Product | Action |
|---|---|---|
| 1 | RVGUARD 16,000 Grains Portable Water Softener for RV, Reduces Hardness & Minerals & Improve Water Quality, Protects Water Systems from Hard Water Damage |

|
| 2 | On The Go OTG4-VM-DBLSOFT Portable Compact Double Standard 16,000 Grain Water Softener with Drinking Water Safe Brass Fittings (NOT made in China, assembled by U.S. Workers in Indiana |
|
| 3 | RV Water Softener with Water Hose, 16000 Grains 3/4" Brass Fittings Food-Grade Resin Soften Hard Water Improve Water Quality Portable Water Softener for RV, Trailers |
|
| 4 | Crystala Filters Portable RV Water Softener, 16,000 Grain with Stainless Steel Garden Hose Quick Connects for RVs, Trailers, Boats, Mobile Car Washing, Pressure Washing |
|
| 5 | PRO+AQUA 16,000 Grain Portable Water Softener for RV, Trailers, Boats, Mobile Car Wash, Pressure Wash – Protects Water Systems from Hard Water Damage and Corrosion, with Pre-Filled High-Capacity Resin |
|
| 6 | H&G Lifestyles Whole House Water Softener 32,000 Grains, NSF certified Whole Home Water Filtration System for Well & City Water, Remove Calcium Magnesium, Food Grade Resin, Silver-Enhanced, 700,000 Gl |
|
| 7 | iSpring ED2000 Whole House Water Descaler, Alternative Electronic Salt-Free Hard Water Conditioner, Reduces Limescale Prevent Deposits Build-up, Different from a Water Softener |
|
| 8 | Electronic Water Descaler System for Whole House, Salt-Free Water Softener - Compatible with Most Pipes, Prevents Limescale Build-Up, Easy Install & Maintenance-Free |
|
| 9 | RV Water Softener System with Heavy Metal Filter & Protective Cover | 16,000 Grain Capacity | Removes Odors, Extends Resin Life 15% | Universal Fit for Motorhome, Camper, Travel Trailer |
|
| 10 | VEVOR RV Water Softener, 16,000 Grain Portable Water Softener, with 3/4" Brass Fittings and 42" Hose, Soften Hard Water Filter System for RVs, Trailers, Boats, Mobile Car Washing, Pressure Washing |
|
The control valve is the brain of your water softener, regulating water flow through different cycles. Leaks often originate from this crucial component, specifically from internal parts like the rotor valve, pistons, or the bypass valve. Over time, seals (O-rings) can dry out, crack, or become misaligned due to wear and tear, mineral buildup, or lack of lubrication, leading to drips or a steady stream of water. If you notice water around the top of the softener, especially during a regeneration cycle, a faulty valve or seal is a prime suspect.
Cracked or Punctured Tanks
Both the resin tank (the taller tank where softening occurs) and the brine tank (the shorter tank holding salt) are susceptible to physical damage. Age and wear can lead to cracks, while accidental punctures – often occurring when attempting to break up salt bridges in the brine tank – are not uncommon. A leak from the base of either tank typically indicates a crack, which is a serious issue often requiring tank replacement.
Clogged or Damaged Drain Lines
The drain line is responsible for flushing wastewater during the regeneration cycle. If this line becomes clogged with sediment, salt clumps, or experiences kinks, it can cause water to back up and overflow from the system. Damage such as cracks in the drain line itself can also lead to noticeable leaks, particularly during regeneration when water is actively being discharged.
Loose Connections and Fittings
Water softeners involve numerous plumbing connections, including inlet/outlet lines, brine lines, and drain lines. Vibrations, general wear, or improper initial installation can cause these fittings and connections to loosen over time. A leak around a connection point is often a straightforward fix but can escalate if ignored, leading to significant water loss.
Overfilled Brine Tank / Float Valve Issues
An overfilled brine tank is a common cause of leaks, specifically overflows. This usually points to a malfunctioning float valve inside the brine tank. The float valve is designed to regulate the water level, signaling the control valve to stop filling when it reaches a certain point. If it gets stuck or breaks, water continues to flow, eventually causing the tank to overflow.
Excessive Water Pressure
High water pressure in your home’s plumbing system can put undue strain on your water softener’s internal components, especially valves and seals. If your home’s water pressure consistently exceeds 60 PSI, it can weaken connections and seals over time, leading to leaks. Installing a pressure regulator can help mitigate this issue.
Condensation: A “Leak” That Isn’t
Sometimes, what appears to be a leak is simply condensation. If your water softener is located in a warm, humid area like a basement or garage, and cold water is constantly flowing through the tanks, water droplets can form on the exterior surfaces. This condensation then runs down the tank, pooling on the floor, mimicking a leak. Insulating the tanks can often resolve this.
5 Quick Fixes for a Leaking Water Softener at Home
Before attempting any repairs, always turn off the water supply to your home and put the water softener into bypass mode. If your unit is electrical, disconnect the power supply as well for safety.
1. Tighten Loose Connections
Many leaks are resolved with a simple tightening of connections. Inspect all the fittings and hoses connected to your water softener, including the main water lines, brine lines, and drain lines. Gently use an adjustable wrench to tighten any connections that feel loose. Be cautious not to overtighten, as this can strip threads or crack plastic components, creating a bigger problem.
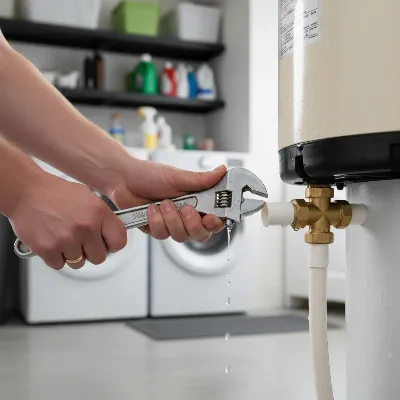 Tightening a water softener connection with a wrench to stop a leak.
2. Lubricate or Replace Worn O-Rings
O-rings are small rubber seals vital for preventing leaks at connection points and within valves. Over time, these can dry out, crack, or become brittle. If you identify a leak around a fitting or valve assembly, the O-ring might be the culprit.
First, bypass the softener and relieve pressure. Carefully disassemble the leaking connection or valve component. If the O-ring appears dry but intact, apply a generous amount of plumber’s clear silicone grease to re-lubricate it. If the O-ring is cracked, stiff, or visibly damaged, replace it with a new one of the correct size. Reassemble the components, ensuring the O-ring is seated properly.
3. Clear Blockages in the Drain Line
A clogged drain line can cause water to back up and leak, particularly during regeneration. To fix this, first, locate the drain line, which typically leads from the control valve to a drain. Inspect it for any visible kinks, bends, or obstructions.
If the line appears clear externally, a blockage might be internal due to sediment or salt buildup. You can try to clear minor clogs by carefully flushing the line with water, or for more stubborn blockages, a plumber’s snake can be used. Ensure the drain line is free-flowing and securely connected to prevent future back-ups.
4. Inspect and Adjust the Brine Tank Float Valve
If your brine tank is overflowing, the float valve inside is likely the problem. This valve’s float should rise and fall with the water level, signaling the system to stop filling the tank.
Bypass the softener and remove the lid of the brine tank. Carefully inspect the float mechanism for any obstructions, salt bridges, or damage that prevents it from moving freely. Clean any salt or mineral buildup around the float arm. If the float valve appears broken or damaged, it will need to be replaced. For some models, simple adjustments can recalibrate the water level.
> “Many apparent water softener leaks are actually just loose fittings or worn O-rings. These are often easy DIY fixes that can save you a service call, but always exercise caution and consult your manual.” – Admin, Reviewcopia.com, Water Treatment Specialist
5. Insulate for Condensation
If you’ve ruled out actual leaks from pipes or tanks and suspect condensation is the issue, insulation can provide a simple solution. Condensation occurs when warm, humid air comes into contact with the cold surfaces of your water softener tanks.
You can purchase insulating jackets specifically designed for water softener tanks. These jackets help to maintain the temperature of the tank surfaces, preventing condensation from forming. Alternatively, you can wrap the tanks with appropriate insulation material, ensuring a snug fit. This will stop the “leaks” that are merely environmental moisture.
When to Call a Professional
While many minor leaks can be addressed with home remedies, some situations necessitate professional help. If you’ve identified a crack in the resin or brine tank, significant damage to the control valve, or if leaks persist after attempting the quick fixes, it’s time to call a qualified plumbing technician. Professionals have the specialized tools and expertise to diagnose complex internal issues, replace major components, or address high water pressure problems that might be beyond the scope of DIY repair. Ignoring these signs can lead to more extensive water damage and costly repairs down the line.
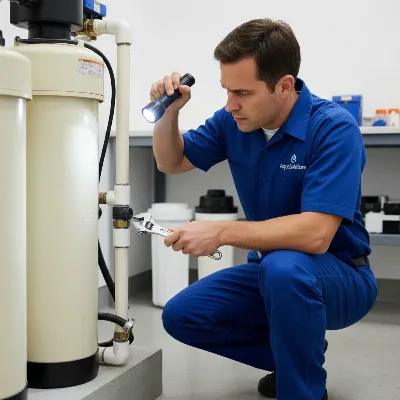 A technician inspecting a leaking water softener with tools.
Conclusion
A leaking water softener can be an unwelcome discovery, but by understanding the common causes and knowing a few quick fixes, you can often address the problem effectively. From tightening loose connections and replacing worn O-rings to clearing drain line blockages and addressing brine tank overflows, many issues are well within a homeowner’s capability to resolve. Remember to always prioritize safety by turning off the water and power before starting any work. While DIY solutions can save you time and money, recognizing when to call in a professional for more complex problems, such as cracked tanks or major valve failures, is crucial to maintaining your water softener’s efficiency and protecting your home. Proactive maintenance and prompt attention to small drips can ensure your system continues to provide soft, clean water for years to come. What preventative steps will you take this week to ensure your water softener remains leak-free?
Câu Hỏi Thường Gặp
How do I determine if my water softener is leaking or just condensing?
To distinguish between a leak and condensation, carefully dry the exterior of your water softener and the surrounding floor. Observe the unit over a few hours. If water reappears as small droplets forming on the tank surface, it’s likely condensation. If water consistently drips from a specific point like a pipe, valve, or seam, it’s a leak. Condensation is more common in humid environments.
Can I use super glue or epoxy to fix a cracked water softener tank?
It is generally not recommended to use super glue or epoxy for significant cracks in a water softener tank. These tanks are under pressure and contain water with salt, which can degrade many adhesives. A temporary patch might fail, leading to more extensive water damage. For a cracked tank, replacement is often the safest and most reliable long-term solution to ensure structural integrity and prevent future leaks.
How often should I check my water softener for leaks?
It’s a good practice to visually inspect your water softener periodically, ideally once a month or every few months, especially before and after regeneration cycles. Pay close attention to fittings, hoses, and the base of the tanks for any signs of moisture, drips, or salt buildup. Early detection of small issues can prevent them from escalating into major problems.
What should I do if my water softener leaks during the regeneration cycle?
If your Water Softener leaks specifically during the regeneration cycle, it often indicates a problem with the control valve, its seals, or the drain line. First, manually put the softener into bypass mode to stop the water flow. Then, carefully inspect the control valve and drain line connections for loose fittings, worn O-rings, or blockages. Some leaks during regeneration can be due to a faulty rotor valve or piston within the control head, which may require professional repair.