Installing a new water softener at home is a feasible DIY project for homeowners with moderate plumbing skills, typically taking 2 to 4 hours. This process involves understanding hard water, selecting the correct system, and following a step-by-step installation guide to ensure safe and effective operation, ultimately protecting appliances and improving water quality.
Water Softener: The Solution for Hard Water
What Is Hard Water? The Damage Hard Water Causes
Hard water is characterized by a high concentration of dissolved minerals, primarily calcium and magnesium. These minerals are naturally picked up as water flows through the ground and rocks. While generally safe for consumption, hard water presents numerous challenges in a home.
The negative effects of hard water manifest in various ways, impacting both your household infrastructure and personal well-being. Over time, these minerals accumulate, forming a chalky buildup known as limescale on plumbing fixtures, inside pipes, and within water-using appliances like water heaters, dishwashers, and washing machines. This scale reduces efficiency, shortens appliance lifespan, and can even lead to increased energy bills as appliances work harder to heat or move water. For your health and comfort, hard water can leave skin feeling dry and itchy, hair dull and frizzy, and can make soaps and shampoos less effective, resulting in more soap scum in your bathroom. Laundry may feel stiff and look dingy, even after a fresh wash. You might also notice white spots on your glassware and dishes after they dry.
What Is a Water Softener? How It Works
A water softener is a whole-house system designed to eliminate these hardness-causing minerals from your water supply before they enter your home’s plumbing. The most common type, an ion-exchange water softener, works on a simple yet effective principle: mineral exchange.
The core of this system is a tank filled with tiny, negatively charged resin beads. These beads are initially coated with positively charged sodium or potassium ions. As hard water flows through this resin bed, the calcium and magnesium ions, which have a stronger positive charge, are attracted to the resin beads and “swap places” with the sodium or potassium ions. The resin beads capture the hard minerals, releasing soft sodium or potassium ions into the water. Over time, the resin beads become saturated with calcium and magnesium and lose their effectiveness. At this point, the system initiates a “regeneration cycle.” During this cycle, a concentrated brine (saltwater) solution from a separate brine tank flushes the resin beads, stripping away the accumulated hard minerals and recharging the beads with fresh sodium or potassium ions. The displaced hard minerals are then flushed out of the system and down a drain.
 An illustrative diagram showing the ion exchange process within a water softener, with hard water entering, calcium and magnesium ions being exchanged for sodium ions on resin beads, and softened water exiting the system.
Key Components of a Water Softener
|
Our Picks for the Best Water Softener in 2026
As an Amazon Associate I earn from qualifying purchases.
|
||
| Num | Product | Action |
|---|---|---|
| 1 | RV Water Softener System with Heavy Metal Filter & Protective Cover | 16,000 Grain Capacity | Removes Odors, Extends Resin Life 15% | Universal Fit for Motorhome, Camper, Travel Trailer |

|
| 2 | VEVOR RV Water Softener, 16,000 Grain Portable Water Softener, with 3/4" Brass Fittings and 42" Hose, Soften Hard Water Filter System for RVs, Trailers, Boats, Mobile Car Washing, Pressure Washing |
|
| 3 | PRO+AQUA 16,000 Grain Portable Water Softener for RV, Trailers, Boats, Mobile Car Wash, Pressure Wash – Protects Water Systems from Hard Water Damage and Corrosion, with Pre-Filled High-Capacity Resin |
|
| 4 | iSpring ED2000 Whole House Water Descaler, Alternative Electronic Salt-Free Hard Water Conditioner, Reduces Limescale Prevent Deposits Build-up, Different from a Water Softener |
|
| 5 | Electronic Water Descaler System for Whole House, Salt-Free Water Softener - Compatible with Most Pipes, Prevents Limescale Build-Up, Easy Install & Maintenance-Free |
|
| 6 | H&G Lifestyles Whole House Water Softener 32,000 Grains, NSF certified Whole Home Water Filtration System for Well & City Water, Remove Calcium Magnesium, Food Grade Resin, Silver-Enhanced, 700,000 Gl |
|
| 7 | RV Water Softener with Water Hose, 16000 Grains 3/4" Brass Fittings Food-Grade Resin Soften Hard Water Improve Water Quality Portable Water Softener for RV, Trailers |
|
| 8 | On The Go OTG4-VM-DBLSOFT Portable Compact Double Standard 16,000 Grain Water Softener with Drinking Water Safe Brass Fittings (NOT made in China, assembled by U.S. Workers in Indiana |
|
| 9 | Crystala Filters Portable RV Water Softener, 16,000 Grain with Stainless Steel Garden Hose Quick Connects for RVs, Trailers, Boats, Mobile Car Washing, Pressure Washing |
|
| 10 | RVGUARD 16,000 Grains Portable Water Softener for RV, Reduces Hardness & Minerals & Improve Water Quality, Protects Water Systems from Hard Water Damage |
|
A typical water softener system consists of several main components working in harmony to deliver soft water:
- Mineral Tank: This is the primary tank where the ion exchange process occurs. It’s filled with resin beads.
- Brine Tank: This separate tank holds the salt (sodium chloride or potassium chloride) used to create the brine solution for regenerating the resin beads.
- Control Valve: The “brain” of the water softener, located on top of the mineral tank. It monitors water usage, initiates regeneration cycles, and directs water flow through the system.
- Bypass Valve: A critical component that allows you to shut off water flow to the softener while still maintaining water to your home. This is essential for maintenance or if the softener needs servicing.
- Distributor Tube: Runs vertically through the center of the mineral tank, helping to distribute water evenly through the resin bed during softening and regeneration.
Choosing the Right Water Softener
Selecting the appropriate water softener is crucial for effective and long-lasting performance. With various types and sizes available, understanding your specific needs is the first step.
Types of Water Softeners on the Market
The market offers several types of water softeners, each with distinct advantages and drawbacks:
- Salt-Based Water Softeners (Ion Exchange): These are the most common and effective, utilizing the ion exchange process with salt (sodium or potassium chloride).
- Pros: Highly effective at removing hardness minerals, proven technology, provides true “soft” water.
- Cons: Requires regular salt replenishment, adds a small amount of sodium to water, involves a regeneration discharge.
- Salt-Free Water Conditioners: These systems, often using Template-Assisted Crystallization (TAC), don’t remove hard minerals but rather alter their structure to prevent them from sticking to surfaces.
- Pros: No salt needed, no wastewater from regeneration, low maintenance, environmentally friendlier.
- Cons: Does not technically “soften” water, may be less effective in very hard water conditions, can be more expensive upfront.
- Dual-Tank Water Softeners: An advanced version of salt-based systems, featuring two mineral tanks. One tank softens water while the other regenerates, ensuring a continuous supply of soft water.
- Pros: Uninterrupted soft water supply, ideal for large households or high water usage.
- Cons: Higher upfront cost, larger footprint due to two tanks.
- Magnetic Water Softeners: These devices claim to condition water using magnetic fields to alter mineral behavior.
- Pros: Easy to install (attaches to pipes), no salt or electricity, very affordable.
- Cons: Limited effectiveness, often considered temporary conditioners rather than true softeners, effectiveness is highly debated and often unproven.
Comparison Table: Water Softener Types
| Feature | Salt-Based Water Softener | Salt-Free Water Conditioner | Dual-Tank Water Softener | Magnetic Water Softener |
|---|---|---|---|---|
| Principle | Ion exchange (removes minerals) | TAC (conditions minerals) | Ion exchange (removes minerals) | Magnetic fields (alters behavior) |
| Effectiveness | High (true softening) | Moderate (scale prevention) | Very High (continuous softening) | Limited (mild hardness only) |
| Maintenance | Regular salt refills, brine tank cleaning | Very low (no salt/regeneration) | Regular salt refills, brine tank cleaning | None |
| Cost (Unit) | $500 – $2,500 | $400 – $3,000 | $800 – $3,500 | $50 – $300 |
| Water Waste | Yes (during regeneration) | No | Yes (during regeneration) | No |
| Sodium Added | Yes (trace amounts) | No | Yes (trace amounts) | No |
Guide to Choosing a Suitable Water Softener
Making an informed decision requires considering several factors tailored to your household’s specific needs:
- Water Hardness Level: This is paramount. Test your water hardness (test kits are readily available) to determine the grains per gallon (GPG) or parts per million (ppm). This will dictate the capacity your softener needs.
- Household Water Usage: Estimate your daily water consumption based on the number of residents and their habits (e.g., showers, laundry, dishwashing). This helps calculate the necessary “grain capacity” of your softener, ensuring it can meet demand without frequent regeneration.
- Budget: Consider both the upfront cost of the unit and ongoing expenses like salt for regeneration or potential filter replacements.
- Space Availability: Water softeners, especially the brine tank, require space. Measure your intended installation area to ensure the unit fits comfortably, allowing for access during maintenance.
- Efficiency: Look for systems that are water and salt-efficient, often indicated by metered regeneration (regenerates based on actual water usage) rather than time-based (regenerates on a fixed schedule).
- Brand and Warranty: Research reputable brands known for reliability and customer support. A good warranty offers peace of mind.
- Additional Features: Some systems offer smart features like Wi-Fi connectivity, low salt alerts, or integrated filtration for other contaminants like iron.
How to Install a New Water Softener Safely at Home
Installing a water softener yourself can be a straightforward project if you have basic plumbing knowledge and follow instructions carefully. Safety and proper connection are key to a successful, leak-free system.
Tools and Materials You’ll Need
Before you begin, gather all necessary tools and materials:
- Water softener unit and installation kit: This typically includes fittings, hoses, and a bypass valve.
- Pipe cutter (copper or PEX/PVC): For cutting into your main water line.
- Pipe wrenches and adjustable wrench: For tightening and loosening pipe fittings.
- Teflon tape or pipe sealant: To ensure watertight, threaded connections.
- Drain tubing and drain saddle: To connect the softener’s discharge to a nearby drain.
- Buckets and towels: For managing water spills.
- Measuring tape, marker, level: For accurate placement and cuts.
- Safety glasses and gloves: Essential for personal protection.
- Soldering torch and solder (if working with copper and not using sharkbite/compression fittings): Handle with extreme caution.
- Electrical outlet with GFCI protection: If your unit requires power.
Choosing the Ideal Installation Location
The location of your water softener is critical for both performance and ease of maintenance.
- Main Water Line Entry Point: Install the softener as close as possible to where the main water line enters your home, ideally before your water heater. This ensures all incoming cold and hot water is softened.
- Level Surface: The unit must sit on a clean, level surface to operate correctly and prevent undue stress on connections.
- Drain Access: A nearby drain (e.g., floor drain, utility sink, standpipe) is necessary for the regeneration discharge. Ensure the drain line has an air gap to prevent back-siphoning.
- Electrical Outlet: If your softener has a control valve requiring power, ensure a grounded electrical outlet is within reach, preferably with Ground Fault Circuit Interrupter (GFCI) protection, and located at least 12 inches above floor level to prevent water damage.
- Accessibility: Allow ample clearance around the unit (at least 1 meter on all sides) for future maintenance, salt refilling, and regeneration.
- Avoid Freezing Temperatures: Do not install the softener in areas exposed to extreme cold (e.g., unheated garages in freezing climates), as freezing water can damage the unit.
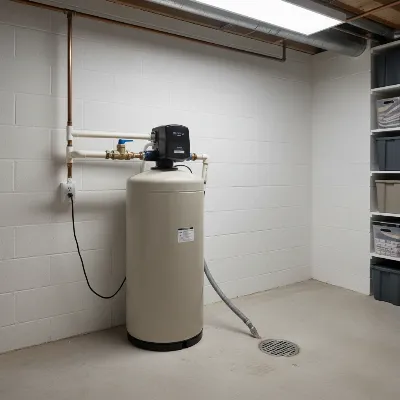 A water softener unit placed in a utility room or basement, showing its proximity to the main water line, an electrical outlet, and a floor drain, highlighting ample space around the unit for maintenance.
Step-by-Step Installation Guide
Step 1: Shut Off Water Supply and Drain Lines
Locate your home’s main water shut-off valve (usually in the basement, utility room, or near the water meter) and turn it off completely. Open a few faucets throughout your home (both hot and cold) to drain the water from the pipes and relieve pressure. If your water heater is electric, turn off its power at the circuit breaker to prevent damage if it drains too much.
Step 2: Prepare the Plumbing and Install Bypass Valve
Identify the main water line where you will install the softener. Using a pipe cutter, carefully cut out a section of the pipe to accommodate the water softener and its bypass valve. Refer to your manufacturer’s instructions for the precise length. Assemble the bypass valve according to the manufacturer’s guide. This valve allows you to direct water around the softener for maintenance. Ensure the bypass valve is installed in the correct flow direction, indicated by arrows.
Step 3: Connect the Water Softener
Position the water softener unit. Apply Teflon tape or pipe sealant to the threaded connections of the bypass valve and the softener’s inlet and outlet ports. Connect the bypass valve to the cut main water line using appropriate fittings (e.g., copper, PEX, CPVC, or flexible supply lines, which are often easier for DIY). Connect the inlet and outlet ports of the softener to the bypass valve. Use two wrenches when tightening connections to avoid overtightening or damaging the control valve.
Step 4: Connect the Drain Tubing
Attach one end of the drain tubing to the drain fitting on the softener’s control valve. Secure it with a hose clamp. Route the other end of the drain tubing to a suitable drain (floor drain, utility sink, standpipe). Ensure there is an “air gap” of at least 1-2 inches between the end of the drain hose and the top of the drain to prevent back-siphoning of wastewater into your softener. Secure the drain line to prevent it from moving during discharge.
Step 5: Connect the Brine Line (for Salt-Based Softeners)
Connect the small brine line from the control valve to the brine tank. This line is typically inserted into a float assembly inside the brine tank. Follow your manufacturer’s specific instructions for this connection, ensuring it’s pushed in completely and secured.
Step 6: Connect to Power
Plug the water softener’s power cord into the grounded electrical outlet. Ensure the outlet has GFCI protection.
Step 7: Turn On Water Supply and Check for Leaks
With the bypass valve in the “bypass” position (water flowing around the softener), slowly open the main water supply valve. Check all connections for leaks. Tighten any leaking connections gently. Once no leaks are observed, slowly move the bypass valve handles to the “service” position (water flowing into the softener).
Step 8: Initial Setup and Regeneration
With the water supply fully open and the softener in “service” mode, slowly open the nearest cold water faucet until all air is purged from the system and water flows smoothly. Refer to your owner’s manual for programming the control valve, which usually involves setting the time, date, and your water hardness level. Add the recommended amount of salt to the brine tank (usually 60-80 lbs initially for a new system, then 1-2 gallons of water). Initiate an initial regeneration cycle manually as per the manufacturer’s instructions. This cycle will flush the system and prepare the resin for softening.
Safety Notes for Installation
- Read the Manual: Always read your water softener’s installation manual thoroughly before starting. Every model can have unique requirements.
- Water Pressure: Ensure your home’s water pressure is within the manufacturer’s recommended range (typically 20-125 psi, with 50-70 psi being ideal). Install a pressure regulator if needed.
- Electrical Safety: If your unit requires power, always use a grounded outlet, preferably GFCI-protected, and ensure all electrical work complies with local codes.
- Local Codes: Check local plumbing and electrical codes. Some areas may require specific components or professional inspection.
- Pipe Compatibility: Ensure you have the correct fittings and tools for your type of plumbing (copper, PEX, PVC, galvanized steel).
- Avoid Cross-Contamination: Ensure the drain line always has an air gap to prevent wastewater from being siphoned back into your water supply.
Maintaining and Using Your Water Softener
Proper maintenance is essential to ensure your water softener continues to deliver soft water efficiently for years to come.
Simple Steps for Longevity
- Monitor Salt Levels: Check your brine tank monthly and keep it at least one-quarter full, but no more than two-thirds full, with high-quality water softener salt pellets or cubes. Avoid rock salt, which can contain impurities.
- Break Salt Bridges: Occasionally, salt can solidify into a “salt bridge” in the brine tank, preventing the brine solution from forming. Gently break up any salt bridges with a broom handle or similar tool.
- Clean the Brine Tank Annually: Drain and clean the brine tank once a year to remove any sediment or sludge buildup. Unplug the unit, empty salt and water, scrub with soapy water, rinse thoroughly, and then refill.
- Check for Leaks: Periodically inspect all hoses, connections, and valves for any signs of leaks or corrosion.
- Bypass Valve: Understand how to operate your bypass valve. You may need to bypass the softener for outdoor watering (if you don’t want to soften water for your garden) or during maintenance.
- Pre-filter (if applicable): If your system includes a pre-filter for sediment or iron, check and replace the cartridge according to the manufacturer’s recommendations. This protects the resin bed.
- Professional Tune-up: Consider an annual professional inspection to calibrate settings, assess the resin bed, and ensure all components are functioning optimally.
Where to Buy a Water Softener
Water softeners can be purchased from various reputable sources:
- Home Improvement Stores: Large retail chains often carry a selection of water softeners and related installation accessories.
- Appliance Retailers: Some appliance stores specialize in home water treatment systems.
- Online Retailers: Many brands offer their products online, often with competitive pricing and direct shipping.
- Plumbing Supply Companies: These specialized stores can offer a wider range of professional-grade systems and expert advice.
- Local Water Treatment Specialists: For personalized recommendations and professional installation services, local experts can assess your water quality and household needs.
Buying Guide: Important Considerations
Before making your final purchase, keep these crucial points in mind:
- Test Your Water First: This cannot be stressed enough. Knowing your exact water hardness is vital for sizing your system correctly.
- Size Matters: An undersized softener will regenerate too frequently, wasting salt and water, and wearing out prematurely. An oversized one is an unnecessary expense. Match the grain capacity to your household’s needs.
- Regeneration Type: Metered (on-demand) regeneration is generally more efficient than time-based, as it only regenerates when needed, saving salt and water.
- Salt or Salt-Free: Revisit the comparison table and choose the technology that aligns with your priorities regarding effectiveness, maintenance, and environmental impact.
- Installation Requirements: Consider the complexity of the installation process for each model and whether you are comfortable performing it yourself or if professional installation is a better option.
- Warranty and Support: A robust warranty indicates manufacturer confidence. Good customer support can be invaluable for troubleshooting or parts replacement.
- Read Reviews: Look at user reviews and ratings to gauge real-world performance and reliability of specific models and brands.
> “Successfully installing a water softener yourself hinges on meticulous preparation and understanding each connection. Don’t rush, and always prioritize safety over speed.” – Admin, Reviewcopia.com, Water Treatment Specialist
Conclusion
Installing a new water softener at home can improve your water quality, protecting your appliances, enhancing your bathing experience, and making household chores easier. By understanding the principles of water softening, carefully selecting the right unit for your home, and diligently following the step-by-step installation guide with safety in mind, you can confidently undertake this DIY project. Regular maintenance will ensure your system continues to provide the benefits of soft water for years to come. Are you ready to take control of your home’s water quality and enjoy the many advantages of softened water?
Frequently Asked Questions
How long does a DIY water softener installation typically take?
A DIY water softener installation can typically take anywhere from 2 to 4 hours, depending on your plumbing experience, the complexity of your home’s existing plumbing, and how well prepared you are with tools and materials. First-time installers might take a bit longer.
Can a water softener be installed outdoors?
While possible in some climates, installing a water softener outdoors is generally not recommended, especially in regions with freezing temperatures. Extreme cold can damage the unit’s components and plumbing. If outdoor installation is necessary, ensure the unit is well-insulated and protected from the elements.
Do I need to hire a plumber to install a water softener?
No, if you have basic plumbing skills, confidence with DIY projects, and are willing to follow instructions carefully, you can install a water softener yourself. However, if you are unsure about your abilities or your plumbing is complex, hiring a professional plumber is always a safe option.
What is an “air gap” for the drain line?
An air gap is a physical separation between the end of your water softener’s drain line and the highest possible water level in the drain receptacle. This prevents wastewater from being siphoned back into your water softener and potentially contaminating your drinking water supply.
How often should I add salt to my water softener?
The frequency of adding salt depends on your water hardness, household water usage, and the size of your water softener. Generally, you should check the salt level monthly and replenish it when it falls below one-quarter to one-third full in the brine tank.
Get our weekly buyer guide
Practical specs, not advice. Unsubscribe anytime.
I appreciated the tips on selecting the correct system for our home. The installation itself was a bit trickier than I expected, even with the guide. I ran into a small issue with a leaky connection that took some extra time to fix. The water is softer now, but I wish there was a bit more troubleshooting advice for common snags.
This guide was a lifesaver for installing our new water softener. I had some moderate plumbing skills, but the detailed instructions on connecting the bypass valve were particularly helpful. Our old system was causing so much scale buildup, and now everything is running smoothly. The water quality improvement is noticeable.
Finally tackled the hard water problem in our house! The explanation of how calcium and magnesium cause issues really hit home. This guide made the DIY installation of our new system straightforward. My wife is thrilled with how much better her hair and skin feel, and I’m happy our water heater will last longer.
I was so tired of the hard water stains on everything, especially my shower doors and dishes. Following the step-by-step guide here made the installation process much less intimidating. It took me about 3 hours, just like it said, and now my appliances are protected and my water feels so much better. Definitely worth the effort!